

What a scary memory for a young child like Laura to remember. But this chapter does remind us that Pioneering was not the romantic image we give it sometimes. Life was dangerous and hard.
Activities for this week:
Or….Paint a Picture of a sunset. Here’s a Little House Group original tutorial!
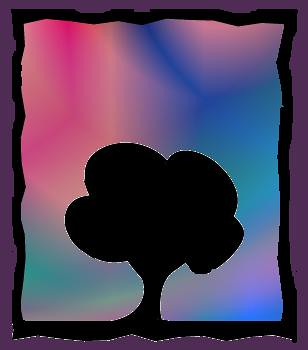
(this is my cheaters version done on adobe illustrator)
Materials:
Take a look at sunset pictures (google images is a great place to start) and note the colors, where they lay in the sky as the sun goes down. Use your picture as a guide to place your paint on the paper.
Spray your white paper with a thin mist of water. Make sure the entire sheet is damp. If your paper is shiny, it is too wet. Use a sponge to wipe off any extra water. (This is called a wet in wet technique. If you need pictures, here is a tutorial)
Start adding paint to the paper with a wet brush using your picture as a guide. The colors should start to bleed and blend together. Clean out your brush as you change colors. Spray the paper lightly again if the paper begins to dry.
Let your paper dry or try a alcohol or salt technique to make your sky paper extra interesting.
Take your black paper and fold it in half. With a pencil draw a frame and then 1/2 of a tree, attached to the bottom of the frame. Make it as basic or as intricate as you wish. Cut out the frame (with tree attached) and lay it over top of your dry water color sky. Attach with glue or tape or your favorite scrap booking method from the back
.
If you make 4 small sky papers, you could do 1 for each season. Sunsets tend to look different at different times of the year
Activities for this week:
- Sit down with the family and review swimming rules. Talk about the differences of swimming in a river or lake vrs a pool. Here is a wonderful link to the Red Cross to refresh you on swimming survival.
- Despite the very bad day Laura’s family had, she still reflects on the beauty of a sun set. The activity for this week is to create something using the colors of a sunset. Here is a wonderful scarf pattern and a childs pullover.
Or….Paint a Picture of a sunset. Here’s a Little House Group original tutorial!
(this is my cheaters version done on adobe illustrator)
Materials:
- 1 piece of white sketch pad paper or water color paper (heavier bond paper a little lighter than card stock)
- childs box of water colors with “sunset colors”
- 1/2 or 1 inch wide paint brush (a childs brush will be fine as well)
- spray bottle of water
- clean sponge or soft rag
- 1 piece of black construction paper same size as drawing paper
Take a look at sunset pictures (google images is a great place to start) and note the colors, where they lay in the sky as the sun goes down. Use your picture as a guide to place your paint on the paper.
Spray your white paper with a thin mist of water. Make sure the entire sheet is damp. If your paper is shiny, it is too wet. Use a sponge to wipe off any extra water. (This is called a wet in wet technique. If you need pictures, here is a tutorial)
Start adding paint to the paper with a wet brush using your picture as a guide. The colors should start to bleed and blend together. Clean out your brush as you change colors. Spray the paper lightly again if the paper begins to dry.
Let your paper dry or try a alcohol or salt technique to make your sky paper extra interesting.
Take your black paper and fold it in half. With a pencil draw a frame and then 1/2 of a tree, attached to the bottom of the frame. Make it as basic or as intricate as you wish. Cut out the frame (with tree attached) and lay it over top of your dry water color sky. Attach with glue or tape or your favorite scrap booking method from the back
.
If you make 4 small sky papers, you could do 1 for each season. Sunsets tend to look different at different times of the year
- Share a comment here about a special memory about pets in your life. They really are mans best friend!
No comments:
Post a Comment